- Published on
How to Create a 3D Tesla Car Configurator with React, Next.js, Three.js and TypeScript - Part 2
TABLE OF CONTENTS

This is my part 2 of my previous post How to Create a 3D Tesla Car Configurator with React, Next.js, Three.js and TypeScript - Part 1. You can find project file ins the github repository Click here In this post we will create a interactive ui changing the color of 3d tesla car with Next.js and React Three Fiber.
Start the server
You can start the server by running the below commands. i am hoping you have clone the repository project from git
npm install
npm run devIf you try to load the http://localhost:3000/ in browser you will see the 3d tesla car configurator (Message me if you found any errors in the terminal while installing or running node packages)

Adding a color picker panel
We need to add a color picker panel for updating the body part of the Tesla 3D car. There is a package called Leva that easily integrates a GUI into a Next.js application. If you want more stylized color-picking dashboards, they can be made using Tailwind CSS and React state management libraries. Here, I am just trying to teach you the basics of how everything works so you can build on top of this.
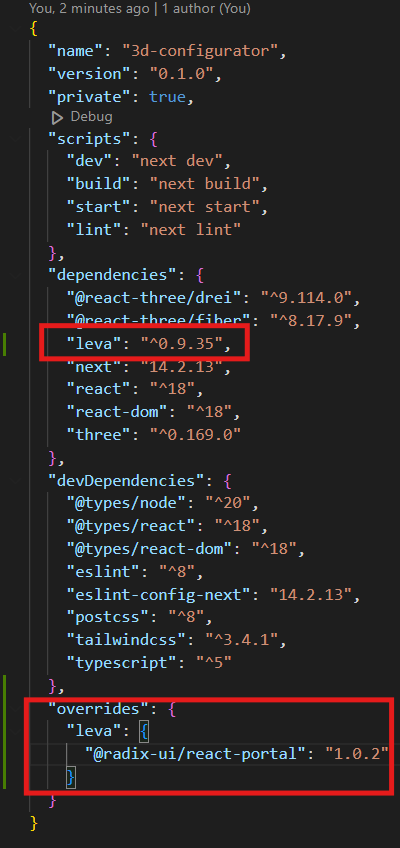
Add this to the dependencies in package.json
"leva": "^0.9.35",Add this after to the devDependencies in package.json "There is an error i have faced when using color picker in next.js". I have found a solution from here Link.
"overrides": {
"leva": {
"@radix-ui/react-portal": "1.0.2"
}
}checkout the screenshot if you have any confusion
Run the command in terminal for installing
npm installUpdate the src/app/components/CanvasRender.tsx component by adding Leva
"use client";
import React, { Suspense, useEffect } from "react";
import { Canvas } from "@react-three/fiber";
import Car from "./Car";
import { Environment, OrbitControls } from "@react-three/drei";
import { Ground } from "./Ground";
import { useControls, Leva } from "leva";
const CanvasRender = (): JSX.Element => {
const { frontLogoColor } = useControls({ frontLogoColor: "#f00" });
const { carBodyColor } = useControls({ carBodyColor: "#f00" });
return (
<div className="w-full h-full">
<Canvas camera={{ fov: 75, position: [0, 5, 5] }}>
<ambientLight intensity={1} />
<OrbitControls
enableZoom={true}
enablePan={false}
minPolarAngle={0}
maxPolarAngle={Math.PI / 2.25}
makeDefault
/>
<Suspense fallback={null}>
<Environment
resolution={256}
background={true}
blur={10}
files="piazza_san_marco_1k.hdr"
></Environment>
<Car frontLogoColor={frontLogoColor} carBodyColor={carBodyColor} />
<Ground />
</Suspense>
</Canvas>
<Leva />
</div>
);
};
export default CanvasRender;Code Explanation
-
First we import
useControlshook andLevacomponent for implementing the color picker guiimport { useControls, Leva } from "leva"; -
After we use
useControlshooks set color picker for each body partconst { frontLogoColor } = useControls({ frontLogoColor: "#f00" }); const { carBodyColor } = useControls({ carBodyColor: "#f00" });Here we updating only two part of the tesla car configurator model for demo. purpose.
-
Update
Carcomponent by passinguseControlscolor values as props.<Car frontLogoColor={frontLogoColor} carBodyColor={carBodyColor} /> -
Add the
<Leva />component toCanvasRender.<Leva />
Adding configurator functionality
Update the src/app/components/Car.tsx
import { useGLTF } from "@react-three/drei";
import React, { useEffect } from "react";
import { Color } from "three";
const Car = ({ ...props }) => {
const { scene } = useGLTF("car.glb");
const carBody = scene.getObjectByName("DoorHandles");
const carFrontLogo = scene.getObjectByName("FrontLogo");
useEffect(() => {
const clr = new Color(props.carBodyColor);
(carBody as any).material.color = clr;
(carBody as any).material.needsUpdate = true;
}, [props.carBodyColor]);
useEffect(() => {
const clr = new Color(props.frontLogoColor);
(carFrontLogo as any).material.color = clr;
(carFrontLogo as any).material.needsUpdate = true;
}, [props.frontLogoColor]);
return (
<primitive
scale={1.6}
rotation={[0, Math.PI / 5, 0]}
castShadow
receiveShadow
object={scene}
/>
);
};
export default Car;Code Explanation
import { Color } from "three";
-
import the
Colorinstance from the library for converting to color code tothree.jsformat for error free use.import { Color } from "three";Using a THREE.Color instance in Three.js helps keep colors consistent, makes it easier to blend or adjust colors, and works well for performance in the Three.js system. It supports different color formats like hex, RGB, and HSL, and fits nicely with shaders and lighting in 3D scenes
-
Next, we need to use the
getObjectByNamemethod from theThree.jslibrary to retrieve the body parts of the Tesla 3D car configurator model. Please check the image below for different part of the 3d model.const carBody = scene.getObjectByName("DoorHandles"); const carFrontLogo = scene.getObjectByName("FrontLogo");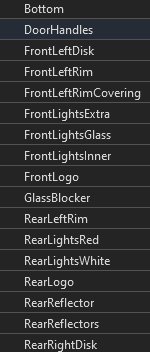
-
Finally we use
useEffecthook fromreact.jsto update the color material of thecarBodyandcarFrontLogomeshes.useEffect(() => { const clr = new Color(props.carBodyColor); (carBody as any).material.color = clr; (carBody as any).material.needsUpdate = true; }, [props.carBodyColor]); useEffect(() => { const clr = new Color(props.frontLogoColor); (carFrontLogo as any).material.color = clr; (carFrontLogo as any).material.needsUpdate = true; }, [props.frontLogoColor]);
If you refresh the browser you will see the below image .
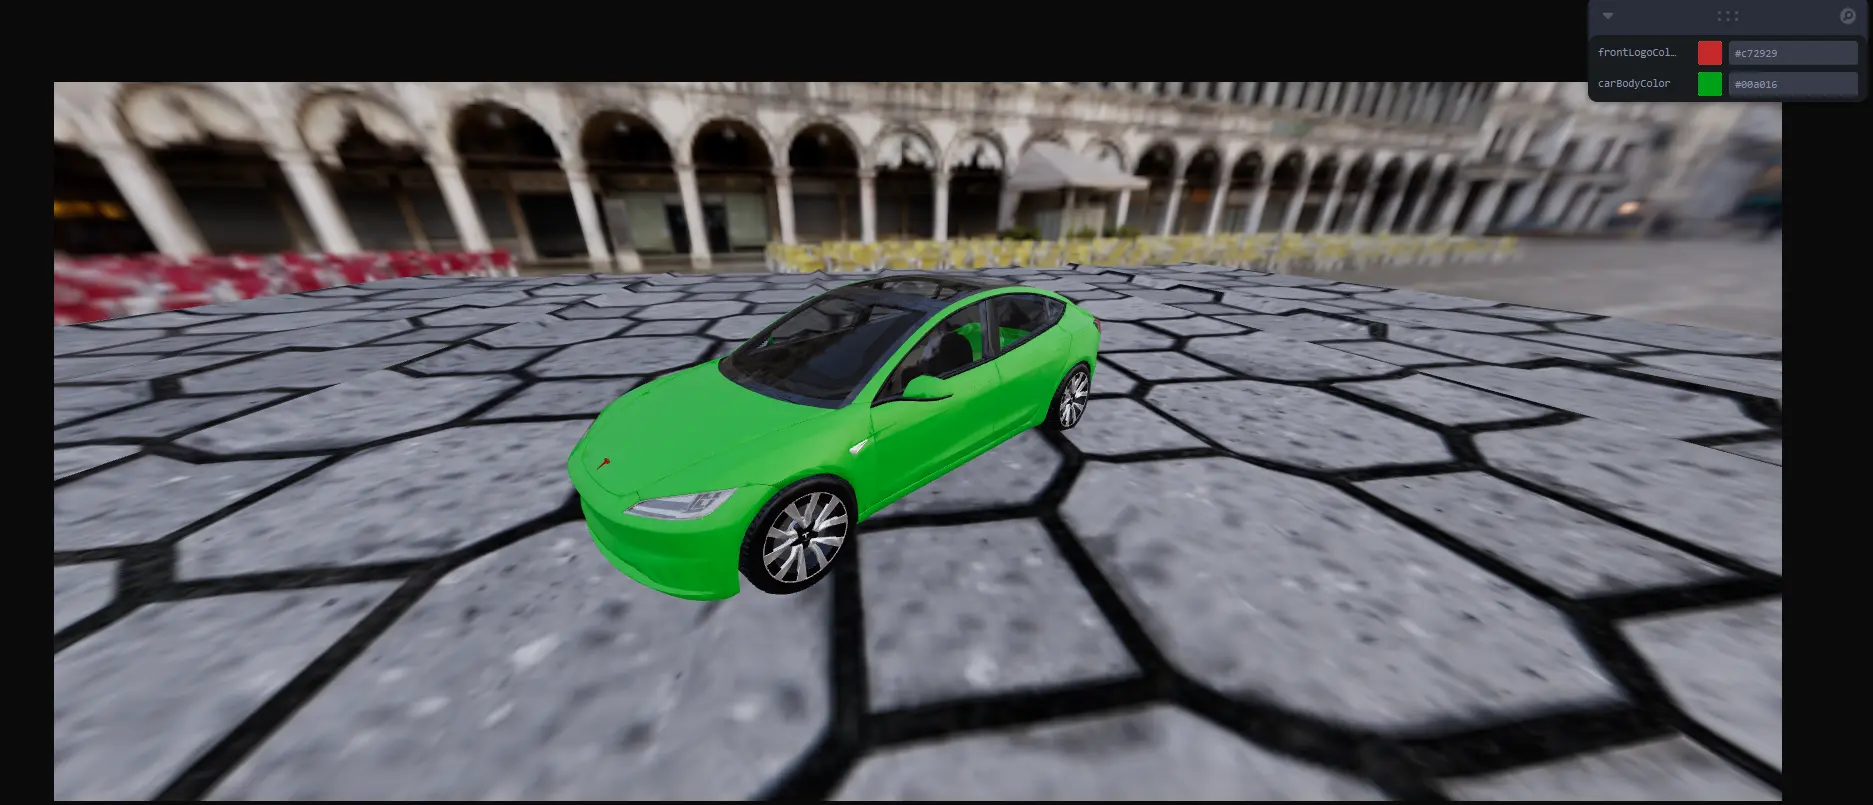
Yes! Our car configurator now works perfectly!
Conclusion
Congratulations you now have a great starting point to build a 3D product configurator using React Three Fiber, Next.js and TypeScript.
The code is available here: https://github.com/rajeshedayangatt/3d-car-configurator
I highly recommend you to read React Three Fiber documentation and check their examples to discover what you can achieve and how to do it.